
Friends, are you looking for a project that is both quick and trendy? Crochet bandanas are back in style! Whether you want to hide a bad hair day or give your outfit a cottagecore vibe, a Simple Crochet Bandana Pattern is the answer.
In today’s blog post, I will guide you step-by-step on how you can create a stylish bandana right from the comfort of your home. This pattern is so easy that even if you just picked up a crochet hook yesterday, you’ll be able to finish it today!
I have also given its video tutorial, if you have any problem in making it then you must watch it.
This blog may contain affiliate links, meaning I may earn a small commission if you purchase through these links at no extra cost to you.

Why You’ll Love This Simple Crochet Bandana Pattern
Crocheting is a relaxing hobby, but large projects—such as blankets or sweaters—can take months to complete. Bandanas are different:
- Quick Reward: It takes only 2–3 hours to make.
- Stash Buster: If you have a little leftover yarn, this is the perfect project.
- Versatile: You can make it using cotton yarn for the summer or wool for the winter.
Materials Needed
Before we begin, make sure you have all of this:
Yarn: You can use 100 % cotton yarn for summer and acrylic or wool for winters. I have used recycled cotton yarn by hobby store (weight 2) which is made from 70% cotton and 30% other yarns.
Recommended yarn:
If this yarn is unavailable to you, you can choose any of the yarns below.
Yarn art: soft, 100% cotton yarn
Katech: mini skeins
Thread art yarn: lovable yarn
Yardage: 110 meters approx
Hook: You can choose the hook according to your yarn, I have used a 3.5 mm hook.
Measuring Tape: To check the size.
Scissors and Yarn Needle: To weave in the ends.
If you’re new to crocheting and don’t know about yarn types and weights, you can use this guide, as well as this guide to hook sizes.
Abbreviations
- ch – chain
- dc – double crochet stitch
- tyw – turn your work
- ch- sp – chain space
- sc – single crochet
- sl st. – slip stitch
- {…} – total number of stitches
- (…) – multiple stitches in one stitch
Stitches that you need for this pattern
To make this pattern you should know Striped Double Crochet Mesh Stitch or basic stitches.
How to make Simple Crochet Bandana: Pattern Guide
We will make this bandana using the “Top-Down” method. This means we will start from the longest side (which rests on the forehead) and work our way down towards the point.
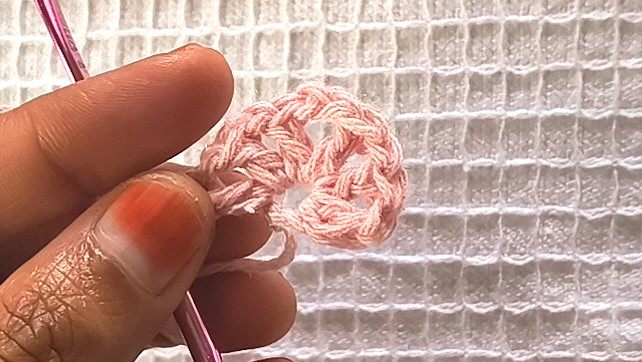
Foundation or row 1
Ch 2
In 2nd chain from the hook
*1dc, 1ch, 1dc* repeat 3 times
2 ch, *1dc, 1ch, 1dc* repeat 3 times {12}
Row 2
ch3 , tyw
First half: Work 1 dc in the next dc, 1 dc in the next ch-sp, and 1 dc in the following dc. Repeat until you have 5 dc up the first side.
Peak: (2 dc, ch 2, 2 dc) in the center space.
Second half : Work 1 dc in the next dc, 1 dc in the next ch-sp, and 1 dc in the following dc. Repeat until you have 5 dc down the second side.{16}

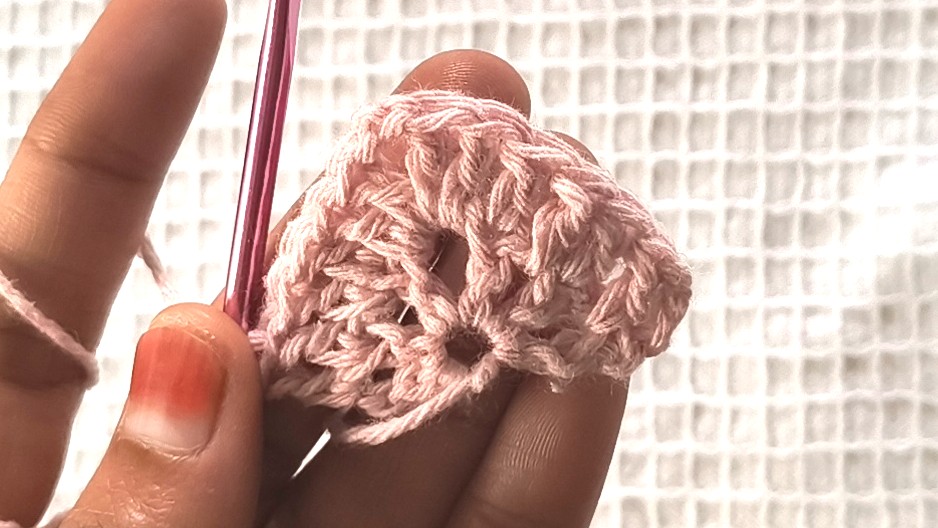
Row 3-22
Repeat Rows 1 and 2 until you reach Row 22, or until the bandana reaches your desired length.
Row 3 has 22 stitches in total.
Remember that As you make rows, your total stitches will increase by 6 stitches.Your last row should have 136 stitches. (Only in the second row the difference in stitches will be 8 stitches.)
Important Note:
👉Always count the turning chain as a stitch, and start the next row right after it. Don’t leave any gap between the turning chain and the stitch, otherwise the bandana may become curved.
👉Also, at the end of the row, make 2 stitches in the same stitch.
| Row # | stitch count |
|---|---|
| 1 | 12 |
| 2 | 16 |
| 3 | 22 |
| 4 | 28 |
| 5 | 34 |
| 6 | 40 |
| 7 | 46 |
| 8 | 52 |
| 9 | 58 |
| 10 | 64 |
| 11 | 70 |
| 12 | 76 |
| 13 | 82 |
| 14 | 88 |
| 15 | 94 |
| 16 | 100 |
| 17 | 106 |
| 18 | 112 |
| 19 | 118 |
| 20 | 124 |
| 21 | 132 |
| 22 | 136 |
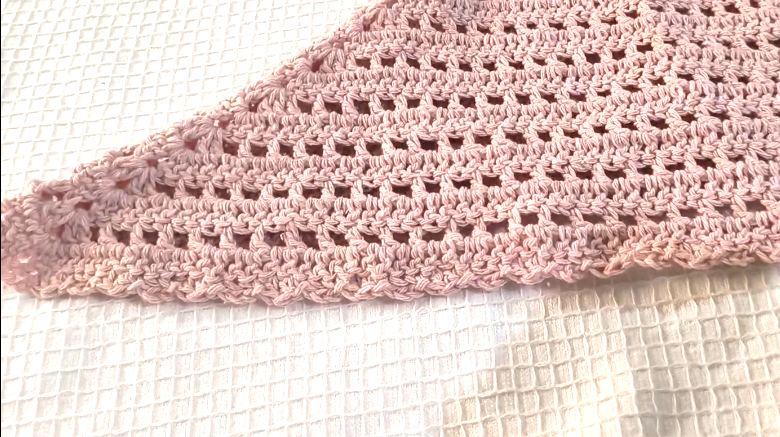
Edging/border
the border is only worked on the two “slanted” sides of the triangle, leaving the long “flat” side (the foundation edge) untouched.
Step 1: Ch 3 and join with a slip stitch into the next stitch.
Step 2: Work 2 dc in the next stitches.
Step 3: Join with a slip stitch in the following stitch.
Step 4: Repeat these steps around the border of the bandana.
Peak: work 5 chain.
")
Making ties and front edge:
First tie
Chain 55
Work 54 sc from the second chain from the hook.
Front edge
*Ch2 , 1 sc in the starting dc of the row , ch2* repeat across
Second tie
Make same as first tie
Join with a slip st.
Fasten off
Weave the ends.
Tips and Tricks for a Professional Finish
If you want your bandana to look like the ones in the market, follow these tips:
- Blocking is Key: After crocheting, the bandana may appear slightly “curly.” Lightly dampen it, pin it to a flat surface, and let it dry. This will open up the stitches and result in a clean shape.
- Color Changing: Change the color after every 2 rows for a cool “Boho look.”
- Tension Check: Do not hold the hook too tightly. The bandana should be somewhat soft and “drapey” so that it can fit the shape of the head.
- You need to make as many stitches moving down as you move up the row.
Common Mistakes to Avoid
- Forgetting Center Increases: If you forget to make an increase at the center point (the Ch-2 space), an odd-looking shape will form instead of a triangle.
- Using Heavy Yarn: If you use Weight 5 or 6 yarn, the bandana will become very heavy and will slip off your head.
- Short Straps: Always make the straps slightly longer. It makes them easier to tie later on.
FAQs (Frequently Asked Questions)
Conclusion
Crocheting isn’t just a skill—it’s therapy. With this Simple Crochet Bandana Pattern, you won’t just learn something new; you’ll also end up with a handmade accessory that is always in style.
So, what are you waiting for? Pull out your favorite yarn and get started today!
If you have any questions, feel free to ask in the comments section below or in my Facebook group. Happy Hooking!
This pattern is for personal use only. You may not reproduce, distribute, or sell this pattern in any form, including photocopies, digital copies, or translations.You are welcome to sell finished items made from this pattern in small quantities, but please credit CROCHET HOURS as the designer.
Your pattern count is wrong. You have 8 stitches up each side on row 2. Can’t do this bandana.
“Thank you for pointing this out. Actually, the stitch count is not wrong. I have added a stitch count table in it, which will be helpful for you. Also, don’t forget to read the important note. If you have any other queries, feel free to ask me.” 😊